This is an instanced quest that starts behind the Gatekeeper in Giran along the side of the temple. The level range for this quest is explicit, so if you are not in the stated level range you will not be allowed to start the quest. This quest will take 60-80 minutes to complete on average, although you have 90 total minutes before the instance will kick you out and reset the monster spawns.
I recommend doing this quest immediately at L61 while you can still get the newbie buffs if possible. Doing so will make the quest easier, as will any A grade armor or jewelry if you have some.
Before you start, I recommend taking a few extra supplies if you don't carry them already. The quest gives you an [A] grade two handed sword to fight with, although you can complete this quest with a low [B] weapon with some buffs.(Scroll, potion or newbie.) So bring the appropriate shots for whichever weapon you think will work best. The weapon will also permit you to use a summon as well. (No crystals necessary to summon it.) Therefore a modest supply of Beast SS is encouraged as well. (2k-3k should be enough.) Please note, this is a 'summon' and not a 'pet'. The shortcuts for the action tab do not have an icon for the /summonattack action, so it helps to create a macro for this action if you are going to use it at all. A pre-existing summon icon works just as well, but any /petattack icons will not.
I also suggest bringing a few Greater Heal Potions with you as well. (~10-20) There will be special healing potions to aquire as well as herbs that drop, but their presense is quite random at the start when you need them the most and thus you cannot rely on aquiring them before they are needed. Alternately, you could just exit and re-enter the instance a few times to build up a stock in the early part of the dungeon, before you fight the first boss mobs.
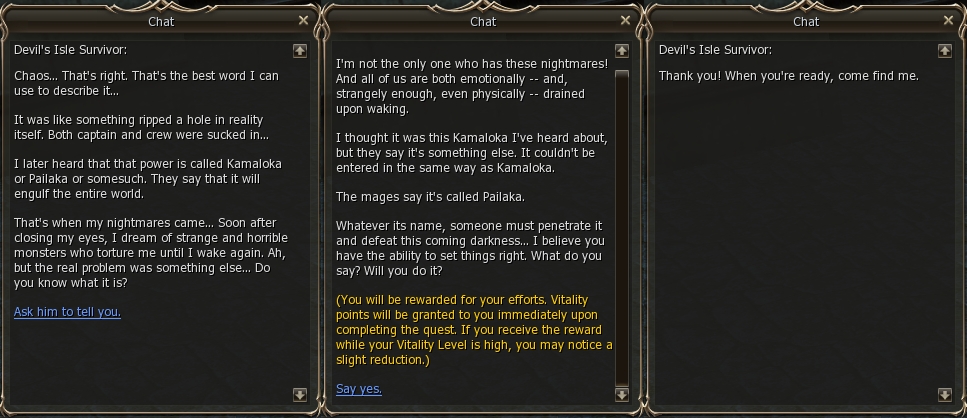
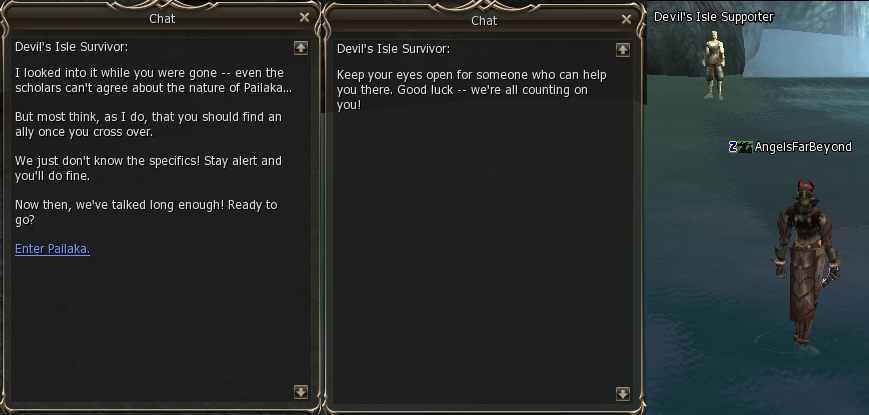
When you are ready, talk to the NPC to get the background and then start the quest. Note however, that you will not automatically start the quest at the end of the NPC introductory text. You have to talk to him again to actually be teleported into the instance.
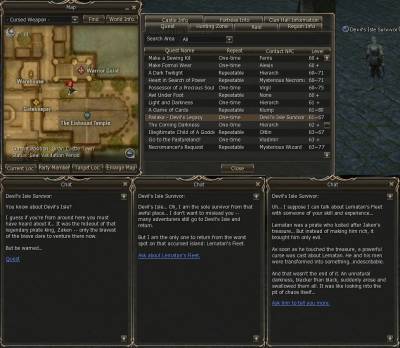
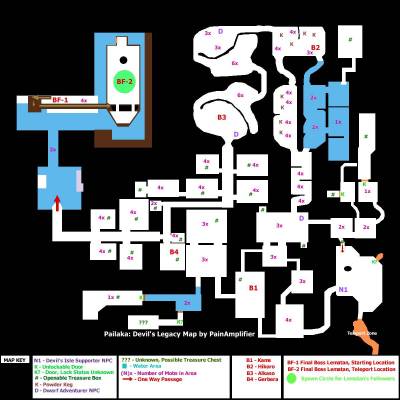
The first thing you should notice when you enter the instance, is the map used. Like the quest title suggests, this quest uses the Devil's Isle map. If you are familiar with the layout already, navigation should be easy for you. If not, I have a full map of the area at the end of this guide you can use to find your way around.
Your arrival point is the first room at Devil's Isle, near the underwater entry/exit tunnel. Note however, that like the earlier Pailaka attempting to leave by this route will teleport you back to the port in location. The actual mechanic is a bit glitched from my experience though, allowing me to exit partway but not letting me back in without crashing. I suggest simply avoiding the area for that reason.
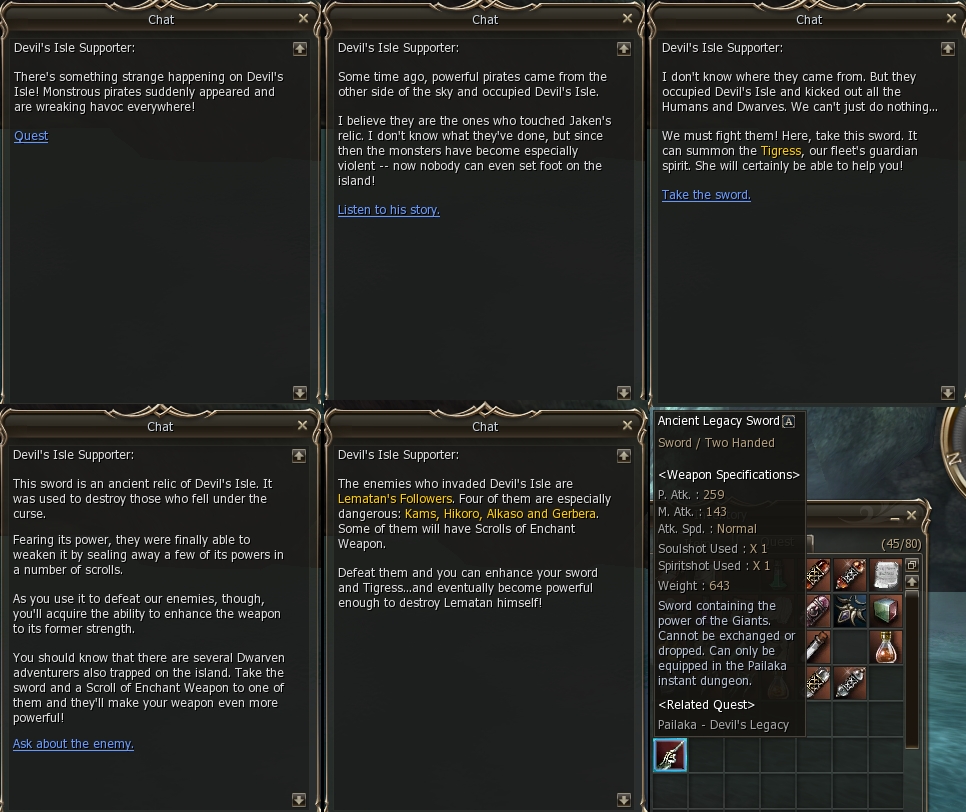
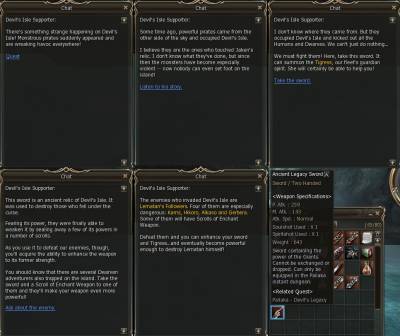
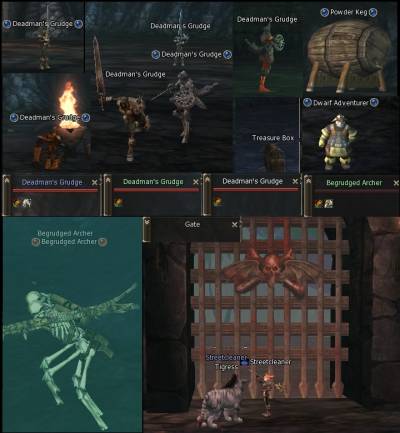
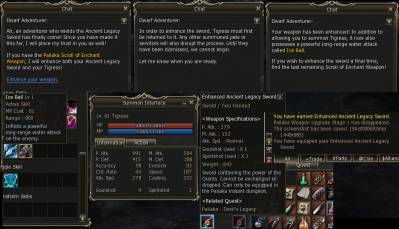
In front of your starting point is the first NPC he gives you the Pailaka weapon and advances the quest. The path deeper into the dungeon is directly behind him. Talk to him to recieve the sword, summon the tiger if you wish and note the boss mobs you need to kill. To summon the tiger, open your skill window and look under the Item Skills of the active tab. Don't forget to add the summons special attack skill to your shortcut bar as well as the /summonattack icon or macro as well. With Beast SS this special skill can just about kill a normal mob in one blow with basic buffs. If the skill hasn't refreshed yet, the summon will just stand there unless you use the /summonattack command. (Which is why you want to add it to the shortcut bar.) Otherwise it will attack normally after using the special skill successfully. The sword/summon can be upgraded twice, but to do so you have to unsummon it first. So if the summon had any buffs you will lose them in the process. Please note: You need to have the sword equipped to summon the tiger, but once summoned you can switch to any other weapon and it will stay summoned.

Preparations complete, inside the dungeon itself you will find 3 types of undead melee mobs all named 'Deadman's Grudge' one ranged mob called 'Begrudged Archer', some 'Treasure Box'es and some 'Powder Keg's as well as a few closed gates and five bosses. There are a mere 5 of the archer mobs at the very end of the dungeon, the vast majority you fight will be the melee ones. A couple of spots have them in very close and tight, so you may be overwhelmed if you do not pay attention and aren't a melee character. These mobs don't drop any adena or materials, just herbs.
The Teasure Boxes drop special Pailaka potions just like the vases did in the previous Pailaka. The Powder keg's are new however. They don't attack, and you don't need to touch them...but if they take any damage they explode dealing a huge amount of damage in a quite wide radius. Enough that they can one hit kill most mobs in their explosion range. And that includes you! Note however, that herbs dropped by mobs killed by the exploding Keg's cannot be picked up, nor do you get any XP/SP for them.
There are a few 'locked' gates in the dungeon as well. You may use the All-Purpose Pailaka Key to open them like you would a chest. The unlock skill does NOT work on them. Of the ones I tried, all I found behind them was another Treasure box that dropped the same items as the others in the dungeon. I was not able to test all the gates, but the one in the entry area was not openable, the others should be marked on the map if I tested them or not.
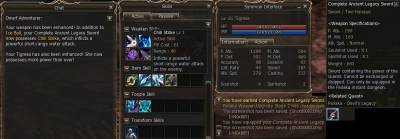
You will also find a "Dwarf Adventurer" NPC in here as well. This NPC is used to 'power up' your sword and summon, but doesn't serve any other real purpose.
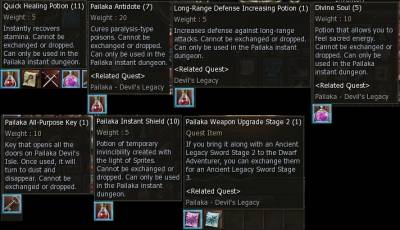
The special Pailaka potions/items that drop in this dungeon are: Quick Healing Potion, Pailaka Antidote, Long-Range Defense Increasing Potion, Divine Soul, Pailaka Instant shield, and Pailaka All-Purpose Key. Two of the boss mobs will give you some weapon upgrade scroll quest items as well.
The Instant Shield and Quick Healing Potion work as they did in the first Pailaka, providing the effect of a normal QHP or 'Invincible' buff for a short period of time. (Roughly 5 seconds.) The Divine Soul potion gives you a 30 'dark' attribute (defense) and the Long-Range defense potion reduces bow damage. The Pailaka All-Purpose key opens the locked gates in the dungeon, but has no other use. The Pailaka Antidote potion is fairly critical for this dungeon. The boss mobs tend to use a debuff that poisons you for a good amount of HP and paralyzes you after a short while. Being unable to remove these effects could get you killed. It's a bit random how much they will spam that attack, with the very first boss mob being the hardest as he uses it the most and you are likely to have few of the antidotes at that time if any. You may find it easier to exit and re-enter the dungeon to respawn the first few treasure boxes for some of the antidotes before killing him rather than wandering deeper and backtracking a lot.
Once you have aquired the quest sword and setup the Tigress summon (If you plan to use it.), I strongly suggest searching out the Dwarf NPC before killing the first boss. This is because the first and third boss mobs will give you special upgrade scrolls for the quest sword, but the quest updating appears glitched if you haven't talked to the NPC's first. (Forcing you to exit and re-enter the instance to reset the quest.) The first boss is placed such that you will usually run into it before you find one of the Dwarf NPC's, while a pair of them practically bracket the third boss.
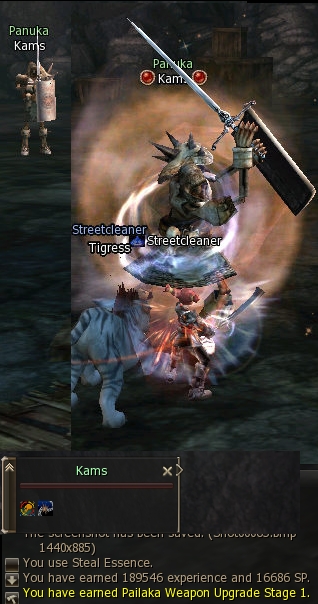
In fact, the first boss mob is a mere two rooms from the starting area, while the first Dwarf NPC is a minimum of four rooms away! So not only will you normally not reach the Dwarf NPC before the boss, but you will probably not have found *any* of the special Pailaka Antidote potions before reaching the first boss. (And I would prefer to have 4-5 of those before fighting him.) Thus my recommended sequence of events, is to bypass the first boss to find and talk to the Dwarf NPC and to search the early part of the dungeon for chests to open for potions, then coming back to kill the first boss. The first boss is named "Kams", and the only real skill of note that it has will be the aforementioned poison+paralyze skill.

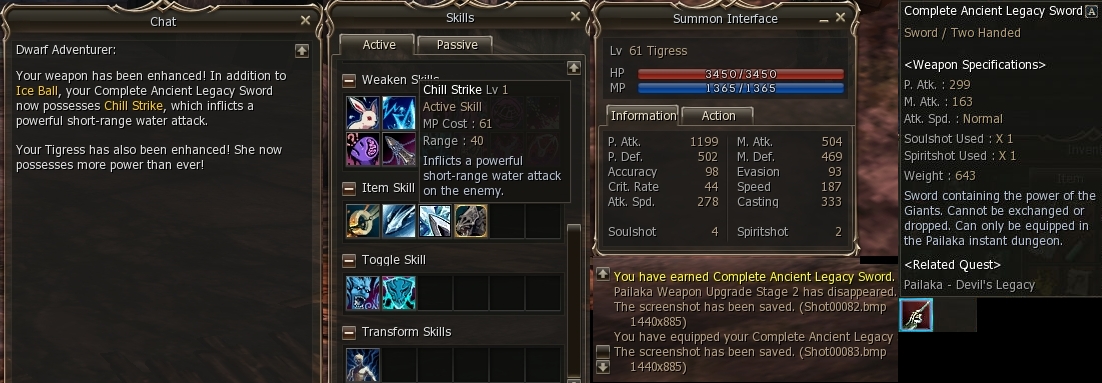
Once the boss is dead, head back to the Dwarf Adventurer NPC to upgrade your sword. The summon doesn't get any better with this upgrade, but the sword's stats improve slightly and you gain a new "Ice Ball" spell to use while the sword is equipped. This is a 900 range nuke skill, so for melee characters the main benefit of this, is the ability to remotely detonate the Powder Kegs you will find a little later in the dungeon.
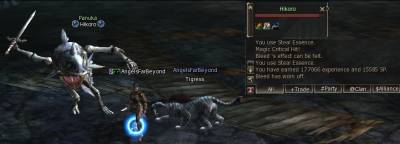
There really isn't anything special to do between the first and second boss other than to explore and find treasure boxes to loot for potions. Except maybe blowing up some of the powder kegs in the area, taking out some mobs as you go. Just be aware that the powder kegs do respawn fairly quickly, so try not to kite or drag the second boss near their locations in case they respawn and you accidentally blow them up with an AOE skill. The second boss itself is called "Hikoro" and other than that annoying poison/para skill it also has a semi-strong spinning strike attack that does a fair amount of damage. Nothing you can't handle with the Pailaka potions by that point, but noticable if you are a low HP class.
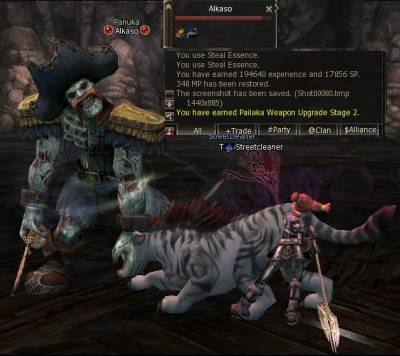
The third pailaka boss gives you another weapon upgrade scroll, but coming from the second boss the path from there to the end of the dungeon is very straightforward and you can't really miss the Dwarf NPC's before and after the third boss. The boss, "Alkaso" isn't much tougher than the previous boss. There is the ever annoying poison/para skill, a fairly weak power strike and a few more HP, but that's about it. He should fall with only slight more effort than the last boss.
Behind him is the last of the Dwarf Adventurers who will upgrade your sword. Be sure to do just that. The sword's stats go up again, as do the stats of the summon. And you also get a second skill to use as well. This one is a melee 'Power strike' type skill called Chill Strike, and it does a fair amount of damage. If you are a melee char already it's probably not going to be awe inspiring compared to your existing skills, but it's worth using on the bosses if you have the MP to spare.
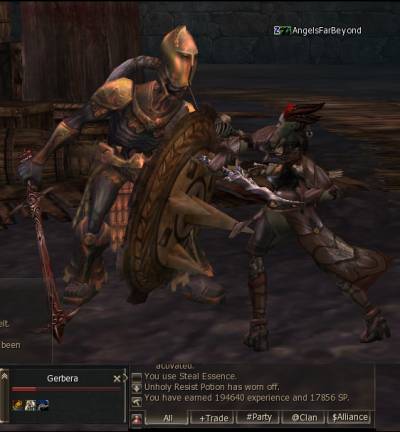
From the Third boss to the end of the dungeon is a direct (but not straight) path to the end. There are lots of side rooms with treasure boxes to loot in them, although you probably could have used them more earlier for the first three bosses. Just past the final side room where the fourth boss can be found the path ends at a ledge over some water. It's a fair drop down, and there is no way back up other than restarting the dungeon, so be sure not to overlook the fourth boss before taking the plunge! The fourth boss is called "Gerbera", and he is noticably tougher than the first three bosses even though he doesn't deviate much from the poison/para and power strike of the previous boss. He just hits harder, has higher defense and more HP.
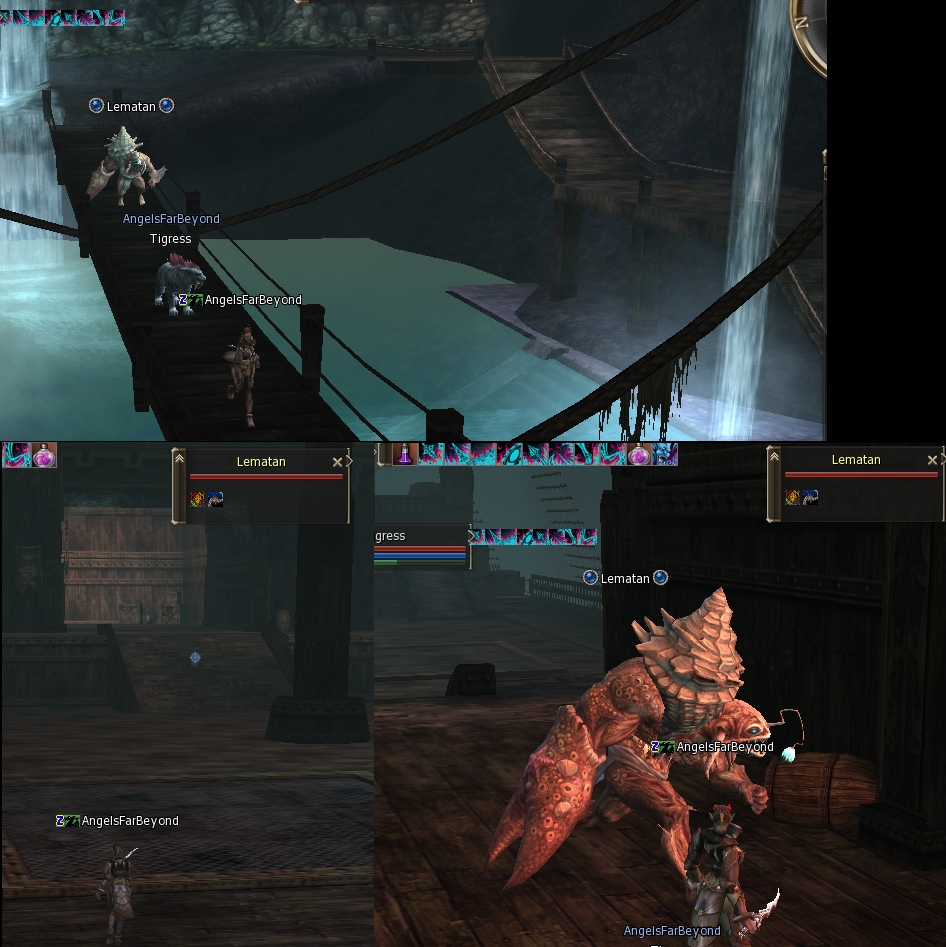
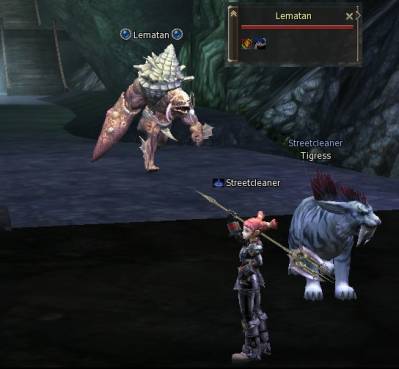
Once Gerbera is dead, you are a mere swim away from the final boss. First you need to drop down into the water under the ledge. Note that you cannot swim/walk up onto the ramp/ledge on the opposite side of the room, but you can walk up onto the broken ship deck to reset your breath meter should you desire it. The path onwards is through the underwater half of the broken ship and the first two archers you meet are waiting at the bottom. Try to swim to the very center of the ship to slip through into the passage, otherwise you will tend to get caught on the broken ship panks. Once run through this map, I manged to get through, but my summon was stuck and I had to go back to get it. (OL buffs being too expensive to recast at that point, making it cheaper to go back than just resummon and have to rebuff.) At the end of the underwater passage you will see a ledge/walkway with the last three archer mobs and the final boss "Lematan". Regardless of their placement, be sure to kill the archers first before focusing your attention on Lematan. If you need to rest, you can follow the right hand wall from the tunnel exit to swim up to the dock and get out of the water on the opposite side of this room near the ship floating here. The pathing around the ledge that Lematan and the Skeletons wait on is a bit glitchy, and you may end up running to the far left where the bridge that leads to the ship is depending on how and where you click. Like other water areas this can be annoying if you try to rush and the game keeps trying to send you anywhere but the straight path to the boss/mobs. If nothing else, just take aggro from Lematan and then hunt down the archers letting him hit you. He doesn't seem to use the poison/para skill like the other bosses and his damage output isn't that high. You should be able to kill the three archers nearby long before the damage he does becomes an issue. He does have a ranged nuke attack, but it doesn't hit very hard nor does he cast it very fast. For the most part, he will just run up and melee you, only using his nuke if you are out of his melee range for too long.
Now this is where things can vary quite a bit. The fight with Lematan isn't a straight-forward brawl like the other bosses. If the fight goes 'normally', when you get him down to about 1/2 his HP, he will port you and himself to the deck of the ship. But, once there a ring of pirate looking mobs called "Lematan's Follower" will spawn in a circle at the center of the ship. The do not move or attack you, but if you do not kill them they will charge up and shoot a beam at Lematan that heals his HP, making him impossible to kill. To kill Lematan, you need to kill his followers then damage him until they respawn (They respawn about as fast as Raid Boss minions, but it's not a strict timer.) then repeat until Lematan dies. If you are a melee class, you can tank Lematan and just have the summon kill the Followers at the same time. Eventually you will be able to kill him with this tactic. Just keep in mind that after he teleports, his 'range' is restricted to the deck of the ship and if you get too far away from the center he will move back to it. (Letting his minions heal him as well if they are alive.)
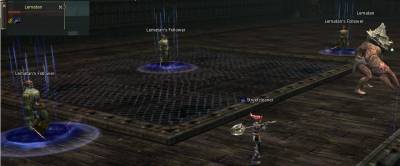
But that's the 'Hard' way to kill him. Either by design or by glitch (And from experience with NCKr and Lineage it could be either.) there are several ways you can make killing him easier. One of which I have tested a couple times and am sure works all the time. Basically, all you need to do is kill the three archers and then instead of attacking Lematan there on the ledge, drag him across the bridge and onto the ship before beating on him and he ports there. I always dragged him to the far end of the ship near the locked door before attacking, but you may not need to go so far. If you do this, when he reaches 50% HP, he still ports to the center of the ship...but none of his minions spawn! So you can concentrate 100% on just killing him instead of messing with his followers.

Other people have mentioned that Rooting or otherwise disrupting his movement (arrest, etc.) prevents him from teleporting onto the ship as well. Although I have not tested those personally. (Every boss in this instance is heavily sleep resistent, but not root resist.)
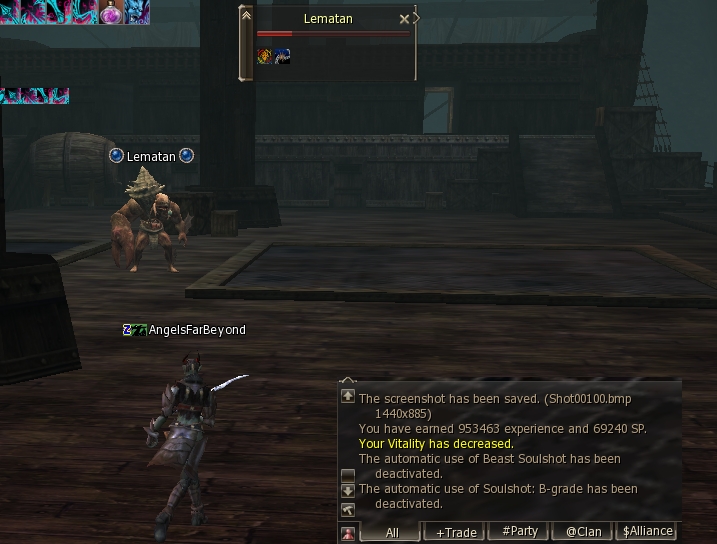
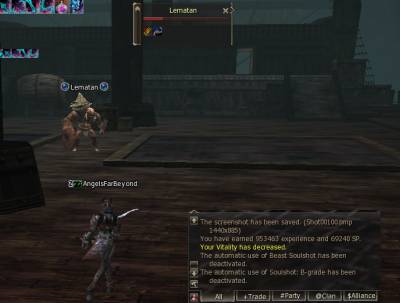
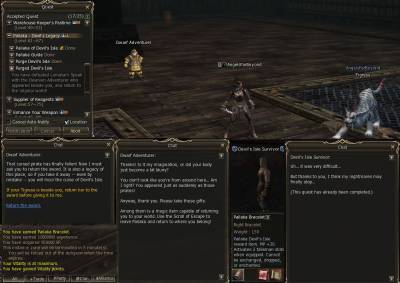
Once Lematan dies, by whatever method you use, a final Dwarf Adventurer NPC will spawn next to the mast at the center of the ship. Talk to him and recieve your rewards for killing Lematan, a Scroll of Escape, 1 Pailaka Bracelet [B grade], full Vitality points, 10,800,000 XP and 950,000 SP.
After you exit the Pailaka, talking to the starting NPC for this quest just brings up some text thanking you for help.
A final note about the map included here. I did not get a chance, or enough Pailaka Keys, to try to open all the gates on the map. I have marked the unknown ones with a ? on the map. I do not believe all the doors *are* openable, even with a key. The one in entry area and the one on the ship itself are not openable as I remember playing through, but I'm not 100% sure. Also, this map is a rough estimate, the rooms are not drawn to scale or exact dimensions. In some locations you can see 'through' the walls into an adjoining areas even though you cannot walk directly there. (If at all.) I did not draw the map to show those locations, only paths you can walk or swim through.